How to make a blinking side LayeredImage (MC corner sprite) in Ren'Py
I've been fiddling with making my MC sprite more dynamic recently, and I figured out how to make her blink.
This tutorial features the MC from Into the Depth of the Sky, Lilith.
It is actually very simple, but took me so long to figure out lol.
TLDR; name your parts with side at the beginning and make it blink.
And here are the explanations.
1. Set up
First, set up your layeredimage. I will not be going into much detail on them, but if you need an in-depth, check this tutorial by GruntSteel here. I also read it to set up my own images. Get all of your layers in a folder for neat organization. As you can see in the image, each layer contains one part of the character that will be laid on top of another into the overall complete image. It is up to you how you want to separate the layers. I usually do the base, eyes, face, blush, outfit, and hair accessories. Back hair is optional, I just find it more convenient to draw it in a separate layer.
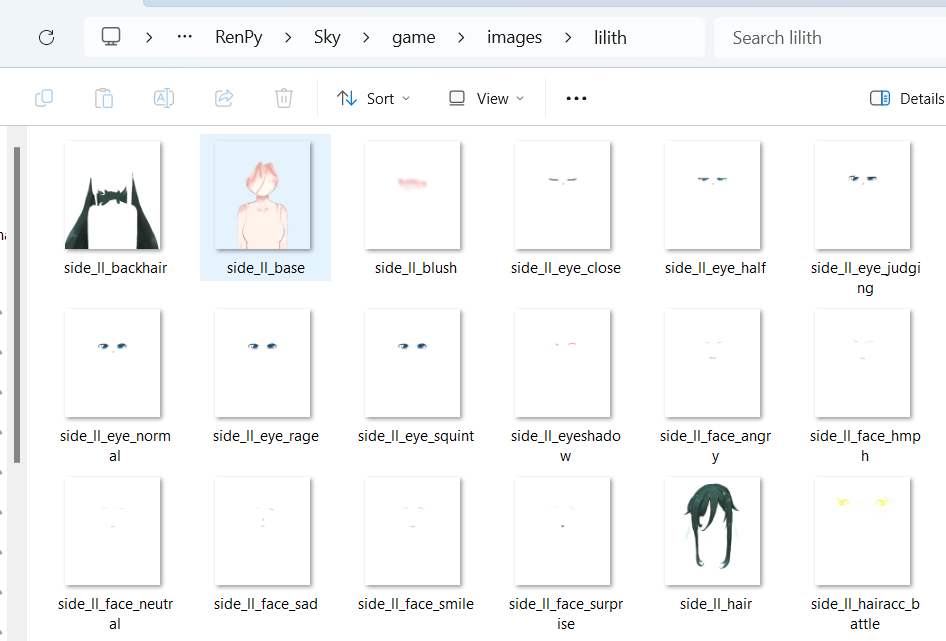
*Notice here that I start all the file names with side. This 'side' tells Ren'Py that the image is a side image and should go at the bottom left (or wherever you've customized it to go). You can customize this by going to gui.rpy and finding SideImage(), then play around with the alignment.
2. Code in Ren'Py
Go to the place where you define your images and write the code for the layeredimage! If you already know how to do this, skip to the next section.
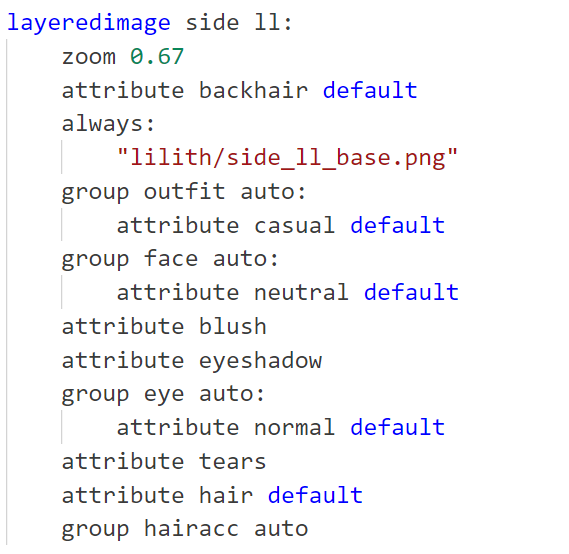
Here is the example from my game:

Explanation:
layeredimage - tells Ren'Py this is a layered image.
side ll - (I don't know if this side is necessary but) tells Ren'Py this is a side image...again. (I like making sure.) ll is my image tag, so in the character definition I added it here:
define ลล = Character(_("ลิลิต"), window_background="gui/textbox_ll.png", image="ll", color="#a8cac9")
zoom - adjust the size of the image. I drew it waaay to big for the space I want, so I set to zoom to 0.67.
Now, for the attribute part, you have to define the ones that go at the bottom first. Think of it like making a hamburger. You put the bottom bun down first and the top bun last, and that's also how you layer your image in Ren'Py. Here, my order is back hair > base > outfit > face > eyes > front hair > hair accessories
default - will make this part show up on default unless told to remove or specified something else. If you change a scene, Ren'Py will show the defaults in the new scene if you don't tell it to show something else. It is convenient that you don't have to tell the game to show this particular part every time you change a scene.
group [attribute] auto - a group is a collection of different versions of the same part, like your different expressions or outfits. This 'auto' will make Ren'Py figure out that every part with the tag 'outfit' in it belongs in the 'outfit' group, so you do not have to specify every attribute. For example, I have three outfits: uniform, fancy, and casual, and they belong to the group 'outfit'. If I want to put them in an automatic group, I just name them side_ll_outfit_[the outfit name], and I can also tell Ren'Py which outfit to show on default so that my sprite isn't naked if I forgot to tell which outfit to wear. Different parts of the same group cannot show up at the same time, ie. you cannot wear two outfits at once.
always - tells Ren'Py to always show this part. Unlike default, this cannot be removed by using -[attribute].
Now that we are done with the layeredimage part, let's go to blinking.
3. Blinking
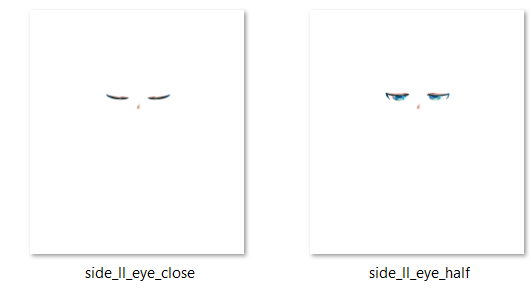
What you need to prepare is an image of the closed eyes. Optionally, you can also have the half-opened eyes. (Plus, you can use these as their own expressions if you need to! How neat.)
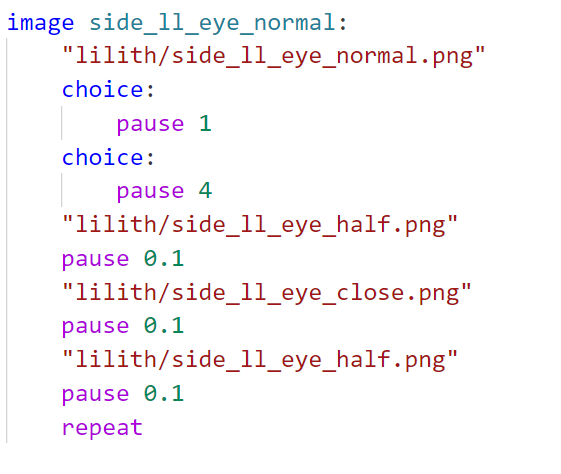
Above your layeredimage code, it is time to define your blinking animation! Here is mine:
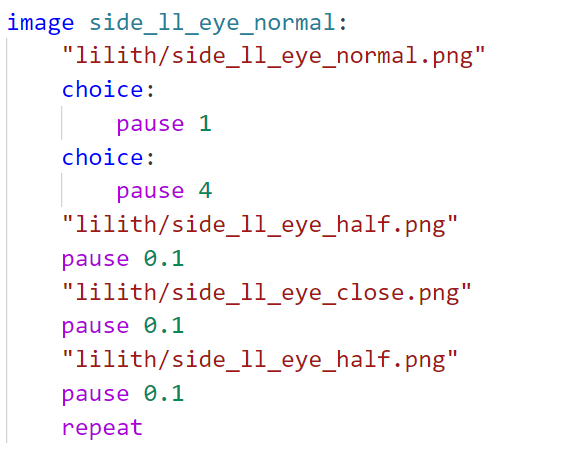
Explanation:
image - defines the image. side_ll_eye_normal is my image name for her normal/'default' eyes. In the layeredimage, Ren'Py will use this definition as her 'normal' attribute instead of the static .png image with the same name.
Under this definition is where we make the animation. I want the normal/'open' eyes to be shown first, so I specify the file name for it first.
**Note: it is very important that you include the .png here. You will get an error if you include your file name without the file extension.
choice - Ren'Py will randomly choose one of the choices listed every time the animation is played. Here, I have two choices for Ren'Py, whether to show her open eyes for 1 or 4 seconds. You can add more choices and play around with the numbers to see what suits your character best.
After this, I just let Ren'Py run her eye half-open and eye-close pictures for 0.1 second. (I actually found that 0.0# second looks more natural, but it also depends on what you're going for.)
repeat - make the animation loop.
You can do this again if you have more than one eye attributes.
Here is the final product:
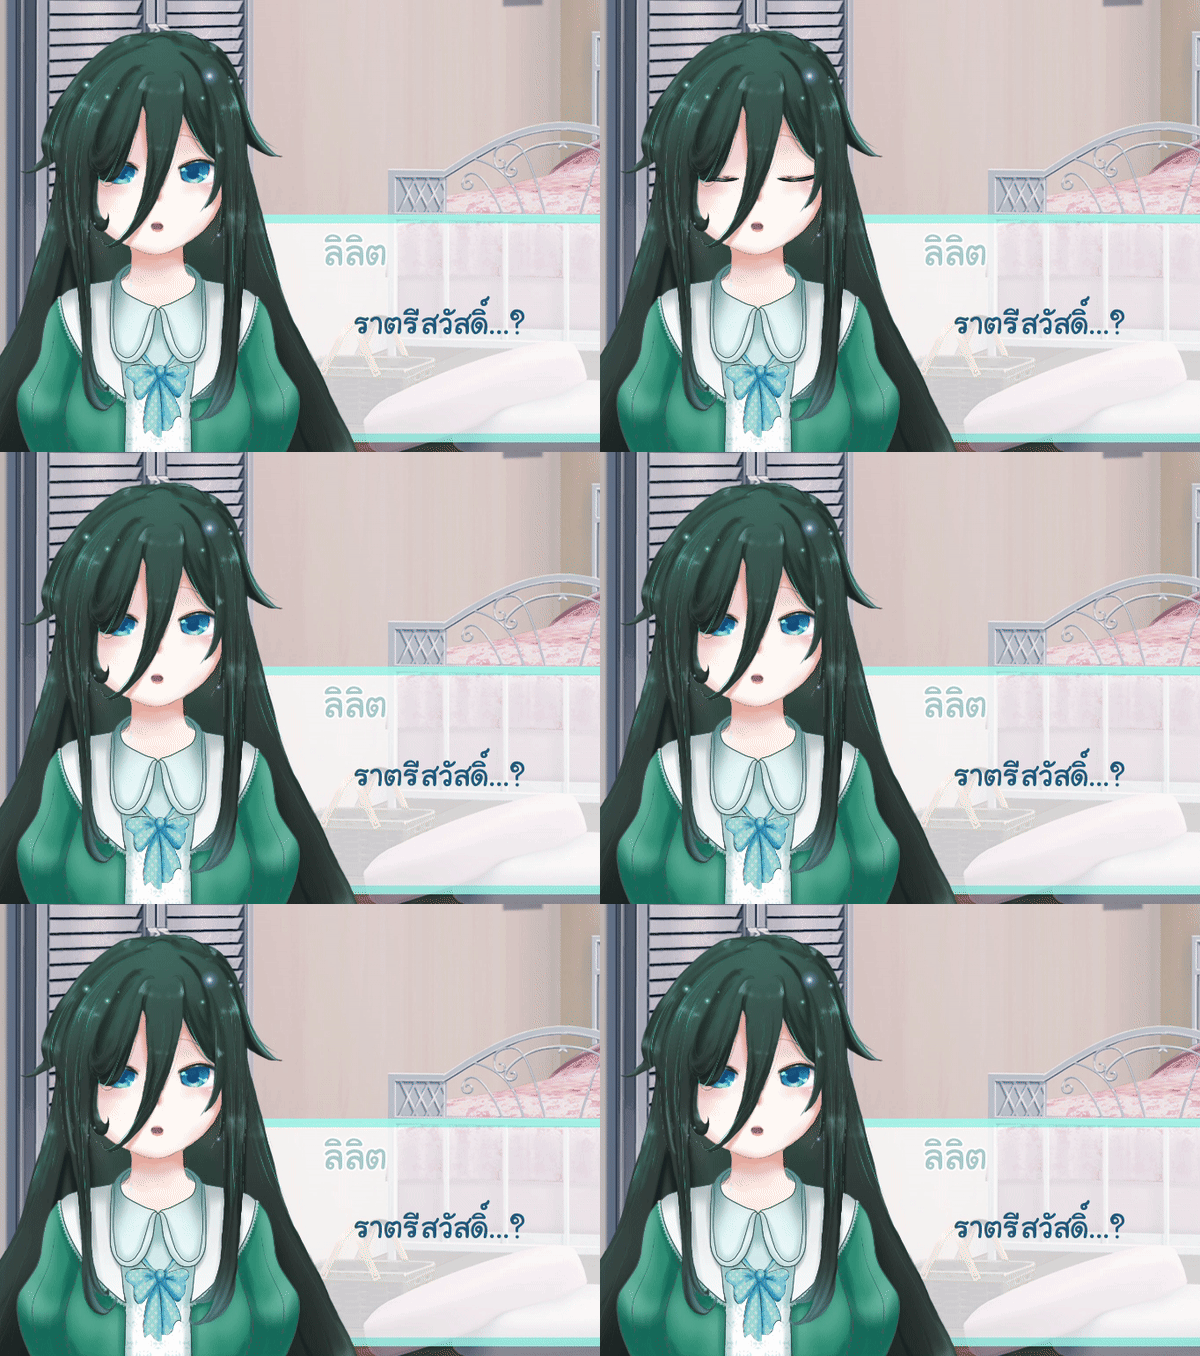
And that's it, really. I hope it was useful.
Some extra things:
Why did I use layeredimage? Because Lilith has 4 outfits, 3 eye variants, 2 hair accessories, and not even counting the expressions. It will be a nightmare to have a separate image for every single combination I use in the game.
The app this game was first made in (which shut down, which was why I migrated to Ren'Py) had no layered function for side images. This was the result:

Doesn't look like much, it was so annoying finding the right expression in this hive of files. Now, with the side image being on a layeredimage system, I have much more flexibility to combine different outfits, accessories, and especially her expressions. The game size is smaller, too, because I don't have a full image for every expression. The players will appreciate that.
Last but most important, I have this post on lemmasoft to thank for the code: https://lemmasoft.renai.us/forums/viewtopic.php?t=51534
I figured that I wasn't the only one who needed this lol.
Get Into the Depth of the Sky [demo] [ENG/THAI]
Into the Depth of the Sky [demo] [ENG/THAI]
Find the truth behind Lilith's amnesia along with her cute bodyguards.
| Status | In development |
| Author | karita0101 |
| Genre | Visual Novel |
| Tags | Cute, Dating Sim, Fantasy, Feel Good, Female Protagonist, josei, live2d, Otome, Romance, thai |
More posts
- DevLog #2 - progress on the gameDec 16, 2024
- DevLog #1 - Updates to the demo! New character!Oct 11, 2024
![Into the Depth of the Sky [demo] [ENG/THAI]](https://img.itch.zone/aW1nLzE4MTMyNDMyLnBuZw==/original/nLur2c.png)
Comments
Log in with itch.io to leave a comment.
thanks for the example!
this helped me a lot ty